An HVAC system that fails during the first heat wave of summer or the first cold snap of winter is not a mechanical surprise — it is a maintenance gap. Seasonal startup and shutdown procedures prepare every system component for the demands ahead and catch problems in a planned, low-pressure window rather than under emergency conditions during peak load. Sign in to OxMaint to schedule seasonal startup and shutdown checklists as recurring PM work orders, or book a demo to see the preventive maintenance calendar configured for your HVAC portfolio.
HVAC / Preventive Maintenance
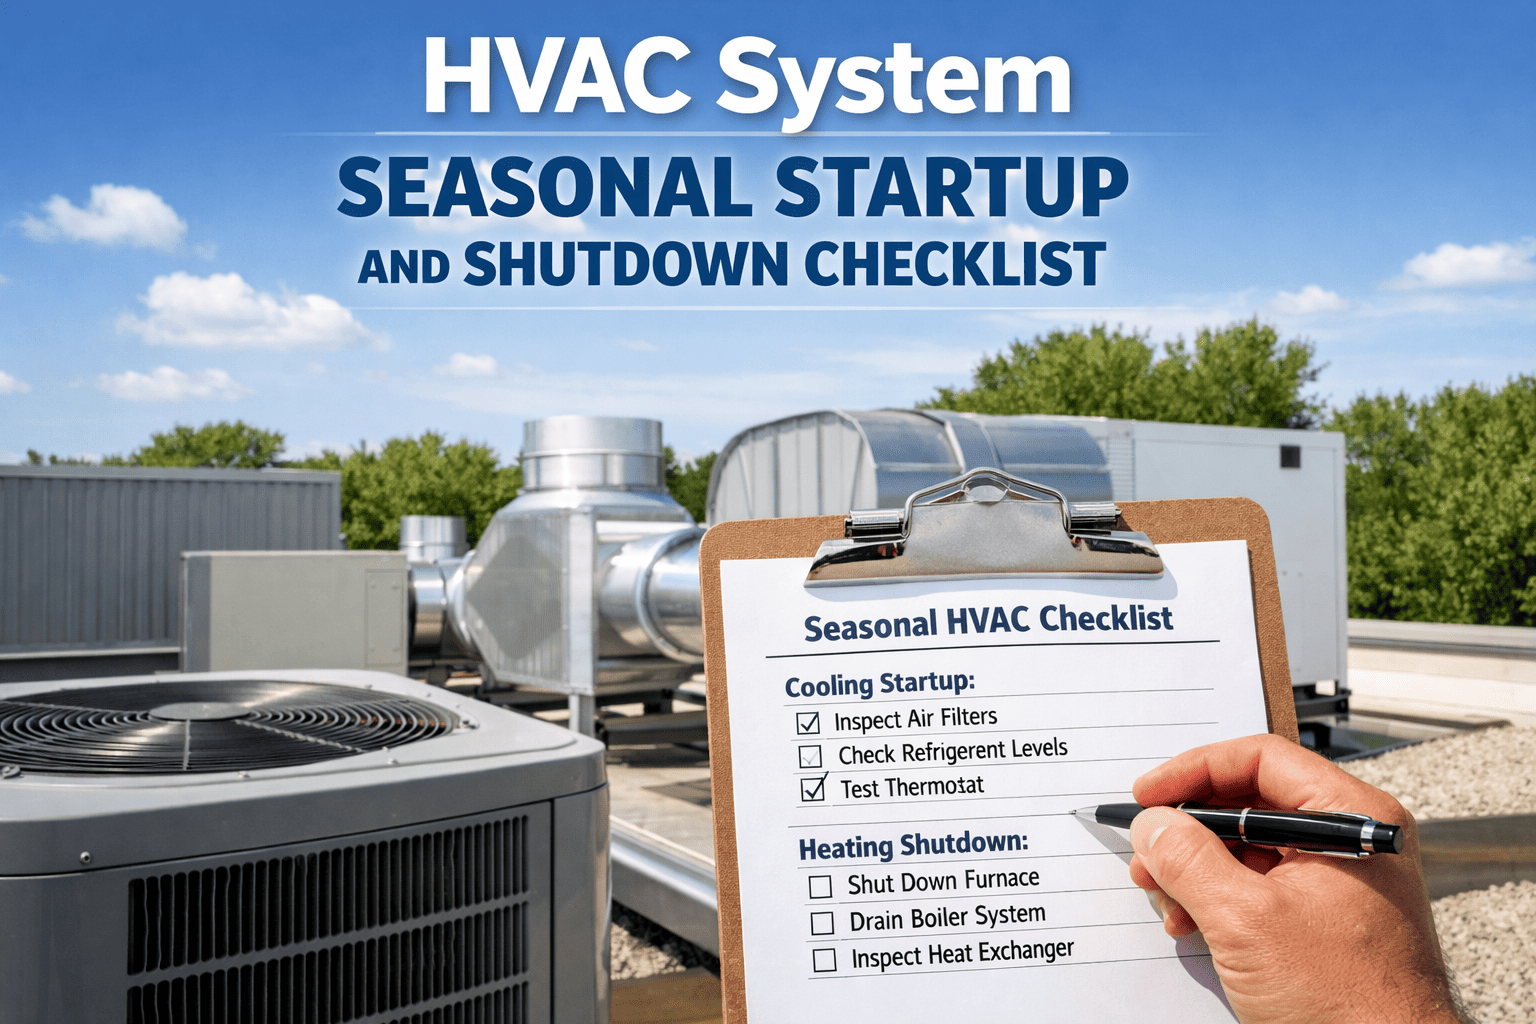
HVAC System Seasonal Startup & Shutdown Checklist
Cooling season startup, heating season changeover, system winterisation, and spring recommissioning — the complete four-season protocol for HVAC systems in commercial and multi-family facilities.
Spring Startup
Summer Operations
Fall Changeover
Winterisation
Spring Cooling Startup
4–6 weeks before first expected cooling demand
Allows time to source parts, schedule contractor visits, and resolve any faults found before the first high-demand day — not during it.
Fall Heating Changeover
4–6 weeks before first expected heating demand
Heating season failures expose occupants to cold and create emergency contractor demand. Lead time before demand allows planned resolution.
Winterisation
After last cooling demand — before first freeze risk
Water in cooling coils, condensate pans, and tower basins freezes and causes cracking. Winterisation eliminates this failure mode entirely.
Post-Season Review
Within 30 days of season end
Document fault patterns, abnormal consumable consumption, and equipment performance changes while observations are current — not next season when context is lost.
Cooling Season Startup Checklist — Spring
Begin this checklist 4–6 weeks before the first expected cooling demand in your climate zone. Every item must generate a pass result before the system is returned to cooling service.
Refrigerant Circuit
Check refrigerant charge — verify operating pressures at full load against manufacturer specifications. Low charge indicates a leak that must be located before recharging.
Inspect all refrigerant line joints, valve packing, and service port caps for oil staining — oil staining at any point indicates past or active refrigerant leak.
Check sight glass — verify refrigerant flow is clear (not bubbly) and moisture indicator is dry (green, not yellow). Moisture in the system requires desiccant replacement and investigation.
Verify thermostatic expansion valve (TXV) superheat setting — adjust if operating conditions have changed since last season.
Condenser & Evaporator Coils
Clean condenser coil — remove debris, fin straighten if bent, and verify no more than 10% fin blockage. Fouled condenser coils reduce capacity and increase compressor head pressure.
Clean evaporator coil — inspect for mould growth and microbial contamination. Treat if present before startup to prevent distribution through the air stream.
Verify drain pan is clean and draining — pour water test confirms drain line is clear. A blocked condensate drain causes pan overflow and interior water damage.
Inspect evaporator drain line — clear any blockages, check trap is intact and filled with water for DX systems.
Compressor & Electrical
Energise compressor crankcase heater at least 24 hours before first compressor start — prevents liquid refrigerant migration to compressor sump during off-season storage.
Check compressor oil level (where visible) — confirm within operating range.
Inspect electrical connections — tighten all terminals, check for corrosion, verify contactors and relays are clean. Loose connections are the leading cause of compressor overheating.
Test all safety controls — high-pressure cutout, low-pressure cutout, freeze stat, and motor overloads. Record trip setpoints and confirm each operates at rated value.
Measure compressor RLA (running load amps) at startup — compare against nameplate. High RLA indicates developing mechanical issues; record for trend monitoring.
Air Handling & Controls
Replace all air filters — check filter housing for bypass gaps. A new filter in a bypassed housing provides no benefit.
Inspect fan belts — check tension and wear. Replace if cracked or glazed. Verify sheave alignment with straightedge.
Lubricate fan bearings — use manufacturer-specified grease. Verify bearing housing temperature is normal after startup (not more than 50°F above ambient).
Calibrate thermostat and controls — verify setpoint accuracy, test economiser damper operation, confirm BMS communication is active and reporting correctly.
Verify supply and return air temperatures at design conditions — document actual versus design delta-T across coil for performance baseline.
Run Seasonal Startup Checklists from Mobile — Every Item Timestamped & Signed Off
OxMaint converts this seasonal checklist into a PM work order that technicians complete from their phone. Every item checked, every measurement recorded, every fault escalated to a corrective work order automatically — before the season starts.
Heating Season Startup & Changeover Checklist — Fall
Heat Exchanger & Burner
Inspect heat exchanger for cracks and corrosion — cracks in the heat exchanger allow combustion gases including CO to enter the supply air stream. Any cracking requires equipment replacement before operation.
Clean burner assembly — remove scale and carbon deposits. Verify burner ignition on first call for heat. Check flame colour (should be blue with slight orange tips for natural gas).
Test gas pressure — verify supply pressure and manifold pressure match burner specifications. Low gas pressure causes incomplete combustion.
Inspect flue and heat exchanger venting — confirm no obstruction, corrosion, or separation at joints. Blocked flue is a CO poisoning risk.
Safety Controls — Heating
Test high-limit temperature cutout — verify it trips at rated temperature and resets correctly. Do not bypass for testing convenience.
Test pressure relief valve on hot water systems — verify it opens at rated pressure. A stuck PRV cannot protect the system.
Verify CO detector placement and function near all gas-fired equipment — test alarm response. Replace sensors older than 5–7 years regardless of last test result.
Test condensate neutraliser on high-efficiency condensing units — pH of discharge should be between 6.0 and 8.5. Replace media if pH is out of range.
Hydronic & Steam Systems (where applicable)
Verify boiler water chemistry — pH, alkalinity, hardness, and inhibitor levels. Out-of-specification chemistry accelerates scale and corrosion.
Bleed air from all radiators and terminal units before first heating cycle — trapped air prevents proper heat distribution and causes water hammer.
Check expansion tank pressure and pre-charge — a waterlogged expansion tank causes system pressure swings and PRV weeping.
Inspect all pump seals, packing, and coupling alignment — start each pump and verify no unusual noise, vibration, or leakage at startup.
Winterisation Checklist — Protecting Systems During Cold Season
Cooling Tower Winterisation
Drain tower basin completely — no standing water that can freeze and crack the basin
Remove and store fill media if freeze damage risk is high in your climate zone
Drain all piping that will not be heated — blow out with compressed air to confirm dry
Close dampers and louvers to prevent wind damage and cold air intrusion into the basin
Remove and properly store any chemical dosing equipment
Tag isolation valves as closed and record state in CMMS for spring recommissioning
Condensate & Drainage Systems
Drain all condensate pans in systems not operating through winter — standing water freezes and damages the pan
Pour glycol solution into drain traps on unused units to prevent trap freezing
Verify heat trace cables on exterior condensate lines are energised and functioning
Inspect and clear roof drains of debris before freeze season — blocked drains cause ice dams and roof loading
Outdoor Units & Equipment
Install manufacturer-approved covers on condensing units — not makeshift covers that trap moisture
Verify crankcase heaters are energised on all refrigerant systems that will experience ambient temperatures below 50°F
Document all equipment in winterised state in CMMS — creates spring recommissioning checklist automatically
Secure all access panels, electrical covers, and inlet screens against wind and ice accumulation
"
The seasonal startup checklist is not a ritual — it is the annual opportunity to catch every slow-developing problem before it becomes an emergency under load. I have seen facilities where the heat exchanger crack that filled offices with carbon monoxide in January was visible as discolouration during the fall startup inspection — but nobody looked, because the checklist was a formality rather than a genuine condition assessment. The value of a seasonal checklist is directly proportional to the seriousness with which each item is actually checked. A technician who signs off the compressor RLA check without measuring it, or marks the heat exchanger as inspected without shining a light through it, has created a liability, not a record. The checklist is only as good as the person executing it — and the system tracking whether every item was genuinely completed.
William Achebe, CEM, CMVP
Certified Energy Manager · Certified Measurement and Verification Professional · 23 years commercial HVAC operations and commissioning · Former Director of Engineering, hospitality and mixed-use portfolio · Specialist in seasonal commissioning, fault detection, and preventive maintenance programme design
Seasonal Checklist Summary — By Season & Key Risk
| Season |
Key Task Areas |
Primary Risk Mitigated |
Timing |
Who Performs |
| Spring / Cooling Startup |
Refrigerant charge, coil cleaning, electrical, filter replacement, controls calibration |
First-day cooling failure, refrigerant loss, compressor damage from liquid slugging |
4–6 wks pre-cooling season |
Certified HVAC technician |
| Fall / Heating Startup |
Heat exchanger, burner, flue, safety controls, hydronic system check |
CO poisoning from cracked heat exchanger, first-day heating failure, pressure system failure |
4–6 wks pre-heating season |
Certified HVAC technician + CO inspection |
| Winterisation |
Cooling tower drain, condensate protection, crankcase heaters, outdoor unit covers |
Freeze cracking of basin, coil, and piping — the most expensive HVAC repair category |
After last cooling load, before first freeze |
Facilities staff + HVAC technician for refrigerant systems |
| Spring Recommissioning |
Reverse all winterisation steps, verify all tagged isolation valves opened, test cooling tower refill |
Operating against closed valve — system damage from starved flow |
4–6 wks pre-cooling season |
Facilities staff — use winterisation tag record as guide |
Seasonal Checklists That Run Themselves — Scheduled, Tracked, and Closed in OxMaint.
Configure spring startup, fall changeover, winterisation, and recommissioning as recurring PM work orders in OxMaint. Every item timestamped. Every fault escalated automatically. Every season documented before the next one begins.
Frequently Asked Questions
How far in advance should seasonal HVAC startup procedures be scheduled?
Industry best practice is 4–6 weeks before the first expected seasonal demand — whether that is the first 80°F day for cooling or the first heating call for warmth. This lead time is not arbitrary: it allows time to source replacement parts, schedule contractor return visits, and resolve any faults found during startup without operating under emergency timeline pressure. A system fault discovered during startup 6 weeks before peak demand is a planned repair. The same fault discovered on the first 95°F day of summer is an emergency repair — typically costing 3–5 times more and displacing other scheduled work.
Sign in to OxMaint to configure seasonal startup PM work orders that auto-generate at the right time for your climate zone.
What is the most commonly missed item in cooling season startup that causes early-season failures?
The crankcase heater pre-energisation step is the most commonly skipped item — and one of the most consequential. When a compressor sits idle through a cold winter, liquid refrigerant migrates from the refrigerant circuit into the compressor oil sump. Starting a compressor with liquid refrigerant in the sump causes liquid slugging that immediately damages internal valves and can destroy the compressor in minutes. The crankcase heater must be energised at least 24 hours before the first compressor start of the season to boil off any migrated refrigerant. This takes 15 seconds to check and 24 hours to execute — it is never the item a rushed startup chooses to prioritise, and it produces some of the most expensive early-season failures.
Should seasonal HVAC procedures be documented even for systems that appear to be functioning normally?
Yes — and this is exactly the distinction between a maintenance programme and an inspection tour. Documentation of normal-functioning systems creates the baseline against which future changes are measured. A compressor running at 94% of nameplate RLA today is not a concern. The same compressor at 107% of nameplate RLA next spring indicates a developing mechanical issue — but only if the 94% baseline was documented. Seasonal records also protect building owners in warranty claims, insurance disputes, and equipment manufacturer warranty negotiations by proving that scheduled maintenance was performed in accordance with manufacturer requirements.
Book a demo to see OxMaint's seasonal PM documentation and year-over-year comparison reporting.