A fryer rarely fails without warning. Oil breaks down, carbon bakes onto the elements, a temperature probe drifts a few degrees, and recovery times slowly stretch until a rush-hour shutdown forces the issue. Most of that decline is visible weeks earlier, but only if someone checks the right thing on the right day and records it. This guide lays out a practical daily, weekly, monthly and quarterly fryer maintenance schedule, the decision rules behind it, and how a sign-off template becomes a living service history inside maintenance management software.
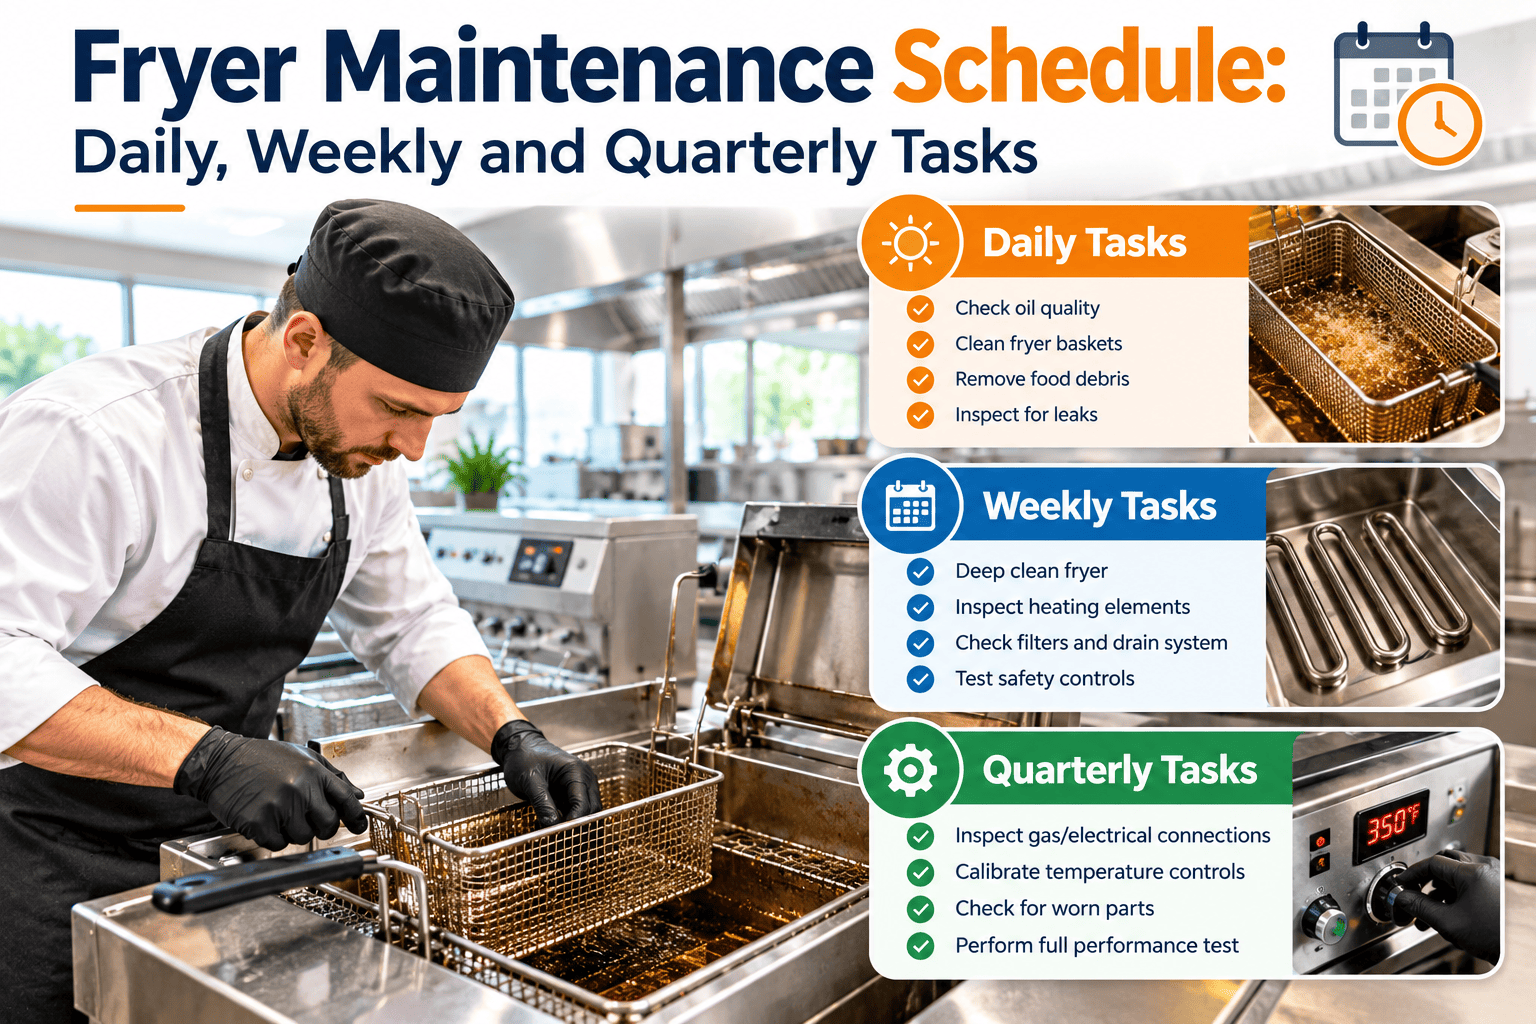
Fryer Maintenance Schedule: Daily, Weekly and Quarterly Tasks
Schedule oil filtering, boil-outs, thermostat checks and safety tests with clear sign-off, so an aging fryer is serviced on your terms and not during Friday dinner service.
A fryer breakdown is a chain of small, skipped checks
Unexpected fryer failure is one of the most expensive surprises in a commercial kitchen because it removes your highest-volume menu items without notice. The chain below is the usual route from a missed task to a dead vat.
Oil quality drifts
Filtering is skipped or irregular, crumbs burn, and breakdown compounds accumulate faster than anyone notices.
Residue builds up
Polymerized oil bakes onto elements, tubes and the vat wall, insulating the heat source from the oil.
Sensors lose accuracy
A coated or bumped probe reads wrong, so the oil runs hotter or cooler than the display claims.
Performance sags
Recovery slows, cook times stretch, and staff compensate by overloading baskets or raising setpoints.
Safety device trips
The high-limit opens, a pilot fails or an element burns out, and the vat is down mid-service.
Where the schedule intervenes
- Steps 1 and 2 are controlled by daily filtering and scheduled boil-outs.
- Step 3 is controlled by thermostat accuracy checks and probe cleaning.
- Steps 4 and 5 are controlled by trend reviews and technician safety inspections before parts fail.
Fryer maintenance tasks by frequency
Frequencies below are practical starting points drawn from common manufacturer and industry guidance. Your fryer model, oil type, menu and volume decide the final intervals, so always defer to the operator manual.
- Skim loose crumbs and debris from the oil during and after service.
- Filter the oil according to your volume and menu, more often for breaded items.
- Check oil quality with a test strip or meter and record the reading.
- Inspect baskets, hooks and drain valves for damage or leaks.
- Wipe down the exterior and cabinet, and clear louvers and vents on blower models.
- Cover cooled vats to protect the oil.
- Intensive clean of baskets, racks, splash guards and the backsplash area.
- Clean filter pans, screens and crumb trays, then check the filter media.
- Inspect hoses, pump connections and the return valve for leaks or slow flow.
- Confirm temperature probes and the high-limit sensor are secure and undamaged.
- Review the week of oil readings for trends.
- Boil-out with approved cleaner, more often for high-volume or heavily breaded production.
- Verify thermostat accuracy against a calibrated digital thermometer.
- Inspect gaskets, drain valves, wiring connectors and tightness of terminals.
- Check burner flames or element condition and remove visible carbon.
- Clean exhaust-side surfaces within reach, per site policy.
- Authorized technician tests the high-limit thermostat and safety circuits.
- Inspect and test the thermopile, gas safety valve and flame-failure devices on gas units.
- Inspect elements, contactors and wiring on electric units.
- Calibrate or replace the operating thermostat if readings are off.
- Review parts replaced, repeat faults and oil cost per vat.
Template layout: what each log line should capture
A schedule only protects you if each task has a pass criterion, an owner and a timestamp. Use this layout as the structure of your printed sheet or digital checklist.
| Task | Frequency | Pass criterion | Result | Done by | Date and time | Follow-up |
|---|---|---|---|---|---|---|
| Skim and filter oil | Daily | No visible debris, filter pan clean | Pass / Fail | Initials | Timestamp | Work order if pump slow |
| Oil quality reading | Daily | Within your site discard limit | Reading value | Initials | Timestamp | Change oil if above limit |
| Probe and sensor check | Weekly | Secure, clean, undamaged | Pass / Fail | Initials | Timestamp | Replace if damaged |
| Boil-out | Monthly | Vat clean, rinsed, fully dry | Pass / Fail | Initials | Timestamp | Repeat if residue remains |
| Thermostat accuracy | Monthly | Reading matches reference thermometer | Setpoint vs actual | Initials | Timestamp | Calibrate if off |
| High-limit and safety test | Quarterly | Trips and resets as designed | Pass / Fail | Technician | Timestamp | Replace part, retest |
Sign-off rule
Two signatures keep the record honest: the person who performed the task, and a supervisor who reviews failed items before the fryer returns to service.
Filter only, or boil out? Decide from observable signals
Unnecessary boil-outs waste labor and oil, while skipped ones shorten equipment life. Measurable signals remove the guesswork and make the decision consistent across shifts.
| Signal | Filter only | Change oil and boil out |
|---|---|---|
| Oil quality reading | Inside your site limit | At or beyond your site limit |
| Oil color and smell | Normal for the product | Dark, heavy, or sharp odor |
| Sediment | Light, removed by filtering | Heavy, returns quickly after filtering |
| Surface foaming | Minimal | Persistent foam during frying |
| Vat walls and elements | Light film only | Baked-on, sticky or gummy residue |
Set your own thresholds
Discard limits for oil quality vary by oil type, menu and local food safety rules, so define yours in writing and keep them on the log.
Eight steps for a safe, complete boil-out
A boil-out dissolves polymerized oil from the vat, elements and tubes. Follow your manufacturer instructions and cleaner label, and wear the PPE your site requires.
Cool and drain
Let the oil cool to a safe temperature, then drain it into an approved container and discard or recycle according to policy.
Remove debris
Scrape out crumbs and sludge, and pull baskets and removable parts for separate cleaning.
Close the drain and add water
Fill the vat with water to the marked level, then add the boil-out cleaner as directed.
Heat the solution
Bring it to the temperature the cleaner recommends, using the boil-out mode if the fryer has one.
Hold and scrub
Keep it hot for the time on the label, then loosen residue with a non-abrasive brush while the unit is safe to touch.
Drain and rinse
Drain the solution, then rinse thoroughly until no cleaner remains.
Dry completely
Wipe the vat dry, because water left behind reacts violently with hot oil. Never hose down a fryer.
Refill, record and release
Add fresh or filtered oil, record the boil-out and sign off before the vat returns to service.
Thermostat and high-limit checks: who does what
The operating thermostat controls cooking temperature, while the high-limit is a separate safety shutoff. Treating them differently is the key to a defensible record.
Operating thermostat
- Compare the display with a calibrated digital thermometer at a stable setpoint.
- Industry guidance suggests a thermostat that reads off by more than about 25 degrees F may need replacement.
- Log setpoint, measured temperature and the difference every month.
- Staff can perform the check if trained and the procedure is written down.
High-limit safety control
- Designed to shut the fryer down when oil exceeds a safe temperature, often around 400 degrees F on many models.
- Testing should be done only by an authorized service agent because of fire risk.
- If it trips, reset once, and if it trips again, stop using the vat and open a work order.
- Record the technician, test date, result and any parts replaced.
Reading fryer symptoms as maintenance signals
Kitchen staff notice problems before anyone logs them. Translating common symptoms into checks helps a cook report something useful and helps a technician start in the right place.
| Symptom | Possible causes | First checks | Typical follow-up |
|---|---|---|---|
| Oil slow to heat or will not heat | Failed element or burner, tripped high-limit, ignition issue | Reset the high-limit once only, check pilot or element status | Stop if it trips again and open a work order |
| Temperature swings during service | Dirty or damaged probe, poor calibration, carbon buildup | Clean probe, skim crumbs, compare with a reference thermometer | Calibrate or replace the thermostat, schedule a boil-out |
| Oil darkens or foams quickly | Poor filtering, overloaded baskets, wrong setpoint, residue in the vat | Test oil, review filtering frequency, check temperature accuracy | Change oil, boil out, retrain on loading and filtering |
| Slow recovery after dropping product | Heat transfer loss from residue, weak burner or element, overloaded vat | Inspect elements or tubes, check flame and load size | Clean, service the burner or replace components |
| Leak near the drain or filter | Worn gasket, loose fitting, failing valve or hose | Inspect drain valve, return valve and hoses | Replace parts and verify before returning to service |
Task differences by fryer type
The base schedule applies to both fuel types, but a few quarterly and monthly tasks depend on how the fryer produces heat.
Gas fryers
- Inspect burner flames and clean orifices as the manual directs.
- Check the pilot, thermopile and combination gas valve.
- Look at flue passages and keep blower louvers clear.
- Have gas connections and pressure checked by a qualified technician.
Electric fryers
- Inspect elements for scale, hot spots and damage.
- Check contactors, relays and wiring connections for wear.
- Verify the element lift mechanism and safety switches work.
- Have electrical tests done by a qualified technician.
Turn the paper log into scheduled work
Set recurring fryer tasks per vat, assign them to the right person and keep every sign-off in one searchable service history.
Where a clipboard schedule breaks down
Paper logs work until a shift is short-staffed. These are the failure points that matter most for fryers.
Paper or spreadsheet
- Tasks get skipped on busy days with nobody alerted.
- Oil readings sit on sheets, so trends are never reviewed.
- A failed thermostat check has no automatic follow-up.
- Service history is scattered across binders and emails.
- Multi-site managers cannot compare vats or locations.
Managed in Oxmaint
- Preventive maintenance schedules create tasks per fryer automatically.
- Mobile checklists capture readings, notes and sign-off at the vat.
- A failed check can generate a corrective work order.
- Asset records keep parts, repairs and technician visits together.
- Dashboards show overdue tasks across every kitchen.
How the fryer workflow runs inside Oxmaint
The same schedule becomes a closed loop once each task, reading and repair is linked to the fryer asset.
Asset
Register each fryer with model, location, fuel type and manuals.
Schedule
Set daily, weekly, monthly and quarterly recurring tasks.
Inspect
Staff complete mobile checklists with readings and sign-off.
Repair
Failed items open work orders for the technician or vendor.
Review
Reports show repeat faults, parts used and overdue work.
KPIs that show whether the schedule is working
Track a small set of measures per fryer and per site, and review them monthly.
Task completion rate
Share of scheduled fryer tasks finished on time, split by shift.
Oil life per vat
Days or loads between changes, which exposes poor filtering and over-temperature use.
Thermostat variance
Gap between setpoint and measured temperature, watched for drift.
Repeat repairs
Same fault returning on the same fryer, a signal to repair properly or replace.
Unplanned downtime
Hours a vat was unavailable without a scheduled reason.
What every fryer record should hold
When a technician, auditor or district manager asks about a fryer, these fields should answer immediately.
- Make, model, serial number, install date and fuel type.
- Recurring task list with owner and next due date.
- Oil change and boil-out dates with readings.
- Thermostat accuracy history and calibration dates.
- High-limit and safety test results with technician name.
- Parts replaced: probes, thermopiles, gas valves, elements, gaskets.
- Repair work orders, cost and downtime.
- Photos, manuals and warranty details.
Fryer maintenance schedule FAQs
How often should a commercial fryer be boiled out?
It depends on volume, oil type and filtering. Many kitchens boil out monthly or after a few oil changes, and busy sites may need it weekly. Follow your manufacturer guidance.
Who should test the high-limit thermostat?
An authorized service technician, because of the fire risk. Staff can verify operating thermostat accuracy, and you can log both in Oxmaint.
How do I know when oil needs changing?
Use a test strip or meter plus color, odor, foaming and sediment. Set a written discard limit that fits your oil and menu, and record each reading.
Can one template cover gas and electric fryers?
Mostly. Keep a shared base and add fuel-specific tasks such as flame, thermopile and gas valve checks on gas units, and element and contactor checks on electric.
Can the schedule run across several locations?
Yes. Each fryer becomes an asset with its own recurring tasks and history, and a short demo shows multi-site reporting.
Stop finding out about fryer problems during service
Put your fryer schedule, readings, sign-offs and repairs in one place, and keep every vat ready for the next rush.