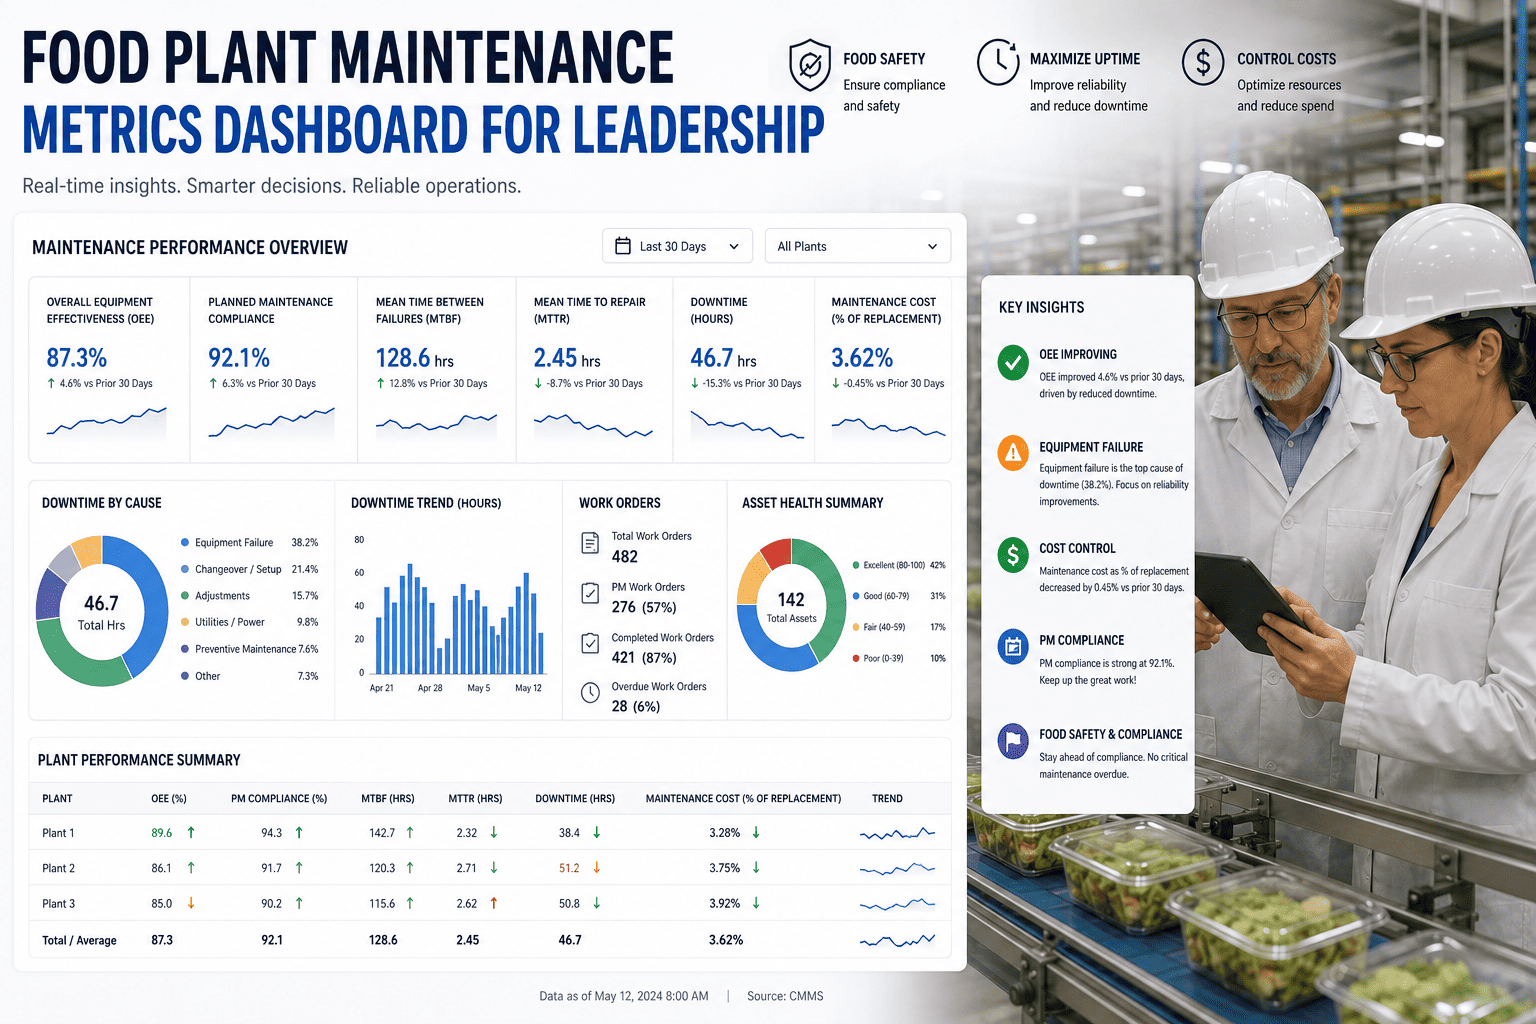
Industrial mixers and blenders are the backbone of food manufacturing lines — but without a structured maintenance program, even premium equipment fails ahead of schedule, drives unplanned downtime, and creates contamination risks that put product quality and regulatory compliance at risk. Food manufacturers that implement a documented mixer and blender maintenance checklist reduce mechanical failures by up to 40% and extend equipment lifespan by an average of 5–7 years. This checklist covers every critical maintenance category: seals, bearings, blades, sanitation, and full preventive maintenance cycles — with frequency, priority, and responsible party mapped to every task. Start a free trial to load this checklist directly into your food manufacturing PM schedule and automate every maintenance task.
Checklist 1: Daily Pre-Operation and Post-Operation Inspection
Daily checks before and after each production run are the first line of defense against contamination, mechanical failure, and product quality deviation. These tasks take under 15 minutes per shift and prevent the majority of in-shift breakdowns in ribbon blenders, planetary mixers, and paddle mixers.
| Task | Frequency | Priority | Responsible |
|---|---|---|---|
| Inspect mixer bowl and blender vessel interior — confirm no residue, product buildup, or foreign material from prior run | Daily (Pre-op) | Critical | Operator |
| Check blade and agitator assembly security — verify all fasteners are torqued and no movement or play is present in the shaft | Daily (Pre-op) | Critical | Maintenance Tech |
| Inspect lid, cover, and gasket seating — confirm covers seat flush with no gaps that could allow contamination ingress during operation | Daily (Pre-op) | Critical | Operator |
| Test safety interlocks and emergency stop — activate each interlock and confirm the drive stops within specified response time | Daily (Pre-op) | Critical | Maintenance Tech |
| Check drive belt condition and tension — inspect for fraying, cracking, or slack that could cause slippage or belt failure mid-run | Daily (Pre-op) | High | Maintenance Tech |
| Verify motor amperage at startup — record draw at no-load and full-load; flag any reading exceeding 10% above baseline as a bearing or mechanical drag indicator | Daily (Pre-op) | High | Operator |
| Inspect discharge valve and outlet port — confirm valve seats fully and shows no product leakage around the valve stem or body | Daily (Pre-op) | High | Operator |
| Post-run clean-in-place (CIP) verification — confirm cleaning cycle completed fully and all food-contact surfaces meet visual and swab standards | Daily (Post-op) | Critical | Sanitation Team |
| Inspect shaft seals post-run for product leakage — check seal faces for any product seepage that indicates wear or loss of compression | Daily (Post-op) | High | Maintenance Tech |
| Log any unusual sounds, vibrations, or temperature events — record observations in the equipment logbook for trending and scheduled follow-up | Daily (Post-op) | Ongoing | Operator |
Checklist 2: Seal and Gasket Inspection Checklist
Seal failure is the leading cause of contamination events in food mixing equipment. Mechanical shaft seals, lip seals, and lid gaskets must be inspected on a defined schedule — degraded seals are invisible to operators during normal runs and are only caught through structured inspection. A proactive seal program prevents product loss, cross-contamination, and unscheduled downtime.
| Task | Frequency | Priority | Responsible |
|---|---|---|---|
| Inspect mechanical shaft seals for face wear and leakage — check for product residue or moisture accumulation around the seal housing as indicators of face separation | Weekly | Critical | Maintenance Tech |
| Check lid and cover gaskets for compression set — press test gasket material; replace if permanent deformation exceeds 20% of original profile height | Weekly | Critical | Maintenance Tech |
| Inspect discharge valve body O-rings and stem seals — verify O-rings are free of cracks, extrusion marks, or swelling from product chemical contact | Weekly | High | Maintenance Tech |
| Inspect agitator bottom bearing seal housing — verify the scraper seal or labyrinth seal at the lower agitator shaft is intact and free of product intrusion | Weekly | High | Maintenance Tech |
| Test seal flush system operation on high-shear mixers — confirm flush fluid flow rate and pressure meet specification; low flow indicates a blocked line or failing pump | Monthly | High | Maintenance Tech |
| Replace food-grade shaft seals per manufacturer interval — do not extend seal life beyond the rated cycle count even if no visible leakage is present | Per OEM schedule | Critical | Maintenance Tech |
| Verify all replacement seals are FDA-compliant material grade — confirm elastomer grade (EPDM, silicone, PTFE) matches food contact specification before installation | At each replacement | Critical | Maintenance Tech / QA |
| Document seal replacement date, part number, and technician — log in CMMS asset record for traceability and regulatory audit documentation | At each replacement | High | Maintenance Tech |
Checklist 3: Bearing Lubrication and Inspection Checklist
Bearing failure accounts for over 50% of unplanned mixer and blender downtime events in food manufacturing facilities. Under-lubrication, over-lubrication, contaminated grease, and incorrect lubricant grade are the four leading causes — all preventable with a documented lubrication schedule. Only food-safe, NSF H1-rated lubricants should be used in any bearing or gearbox serviced on food-contact equipment.
| Task | Frequency | Priority | Responsible |
|---|---|---|---|
| Grease top and bottom agitator shaft bearings with NSF H1 lubricant — apply correct quantity per bearing OEM spec; do not over-grease as excess is a contamination risk | Weekly | Critical | Maintenance Tech |
| Check gearbox oil level and condition — inspect oil sight glass; drain and replace if oil is discolored, milky (moisture ingress), or has exceeded service hours | Monthly | Critical | Maintenance Tech |
| Perform vibration analysis on drive-end and non-drive-end bearings — record RMS velocity readings and flag any value 25% above baseline for immediate investigation | Monthly | High | Reliability Tech |
| Inspect bearing housings for heat — IR thermography or contact thermometer — temperatures above 80°C on standard bearing housings indicate lubrication failure or overload | Monthly | High | Reliability Tech |
| Flush and regrease pillow block bearings on tumble blenders — purge old grease completely before applying fresh lubricant to prevent degraded lubricant pockets forming | Quarterly | High | Maintenance Tech |
| Drain, flush, and replace gearbox oil — use only food-grade gear oil rated for the operating temperature range of the equipment; log oil brand, grade, and volume | Per OEM schedule | Critical | Maintenance Tech |
| Inspect and replace bearing isolators and labyrinth seals — degraded isolators allow contaminant ingress that dramatically shortens bearing life in wash-down environments | Annual | High | Maintenance Tech |
| Verify lubrication route card matches current asset configuration — confirm lube points, quantities, and intervals in CMMS match current installed bearing and gearbox specifications | Annual | Medium | Reliability Engineer |
Checklist 4: Blade and Agitator Wear Inspection Checklist
Worn blades and agitators directly degrade mix uniformity, extend batch cycle times, and — in severe cases — introduce metal particle contamination into food product. Blade wear is rarely visible during normal operation; it is only reliably caught through scheduled dimensional inspection and, in high-risk applications, metal detection verification. A structured blade inspection program closes this gap.
| Task | Frequency | Priority | Responsible |
|---|---|---|---|
| Visually inspect all blade edges for chipping, pitting, or deformation — any edge damage exceeding 2mm depth or showing sharp burrs must be removed from service immediately | Weekly | Critical | Maintenance Tech |
| Measure blade-to-wall clearance on ribbon and paddle mixers — record clearance at three points per blade; clearance exceeding OEM tolerance causes dead zones and uneven mixing | Monthly | Critical | Maintenance Tech |
| Check agitator paddle and ribbon fastener torque — verify all blade-to-shaft fasteners meet specified torque values; loose blades create vibration, wear, and detachment risk | Monthly | Critical | Maintenance Tech |
| Inspect high-shear mixer rotor and stator gap — measure rotor-to-stator clearance and compare against design spec; worn clearance directly reduces shear energy and particle size reduction performance | Monthly | High | Maintenance Tech |
| Inspect planetary mixer attachment drive coupler and bowl lock — verify coupler engagement is positive and bowl lock mechanism holds under simulated load resistance | Monthly | High | Maintenance Tech |
| Measure blade thickness loss on high-wear applications — use calipers to track cumulative material loss; replace blades before thickness reaches minimum OEM threshold | Quarterly | High | Reliability Tech |
| Perform metal detection check following blade inspection or replacement — run a test batch or calibrated test piece through the downstream metal detector to verify any potential blade fragment would be detected | After each blade inspection | Critical | QA / Maintenance |
| Document blade dimensions, wear measurements, and replacement history — log in CMMS with photo evidence; data supports predictive replacement interval optimization | At each inspection | High | Maintenance Tech |
Checklist 5: Mixer and Blender Sanitation Checklist
Sanitation failures on mixing equipment are the primary root cause of allergen cross-contact events and microbiological non-conformances in food manufacturing audits. A documented sanitation checklist — with defined CIP parameters, verification steps, and sign-off requirements — is mandatory for FSMA, SQF, BRC, and HACCP compliance. Every sanitation event must generate a written record.
| Task | Frequency | Priority | Responsible |
|---|---|---|---|
| Complete full wash-down of all food-contact surfaces after each production run — include bowl, blades, agitator shaft, discharge port, lid underside, and any product splash zones | Per run | Critical | Sanitation Team |
| Verify chemical concentration in wash solution — test sanitizer concentration using calibrated test strips or titration; out-of-spec concentration is a critical non-conformance | Per wash cycle | Critical | Sanitation Team |
| Perform ATP bioluminescence swab on agitator shaft and blade roots — record RLU reading; any result above the facility pass/fail threshold triggers re-clean before the next production run | Per run | Critical | QA Technician |
| Inspect and clean discharge valve interior and valve seat — disassemble valve body and verify no product packing in crevices that evade normal CIP spray coverage | Weekly | Critical | Sanitation Team |
| Clean and inspect gearbox exterior and base frame for product accumulation — product buildup on non-contact surfaces harbors pests and creates secondary contamination pathways | Weekly | High | Sanitation Team |
| Strip and deep-clean CIP spray nozzles and headers — remove, inspect, and de-scale all spray devices; blocked nozzles create unsanitary shadow zones in the bowl | Monthly | High | Sanitation Tech |
| Review and update sanitation master schedule against current product allergen matrix — confirm changeover cleaning protocols are current for all allergen and dietary claim transitions run on the equipment | Quarterly | Critical | QA Manager |
| Perform environmental microbiological swabbing program on mixer zone — zone 1 and zone 2 swabs per FSMA preventive controls requirements; positive results trigger corrective action and root cause investigation | Monthly | Critical | QA Technician |
| Verify sanitation records are complete, signed, and stored per retention policy — FSMA requires 2-year retention of all sanitation records; gaps create regulatory exposure during FDA or SQF inspections | Ongoing | Critical | QA Manager |
Checklist 6: Preventive Maintenance Schedule — Monthly, Quarterly, and Annual
Structured preventive maintenance at defined intervals is the foundation of a high-availability mixer and blender program. Daily checks catch acute failures; PM intervals address the accumulated wear that daily inspection cannot see. The tasks below represent the minimum PM scope required to maintain mixer uptime, certification compliance, and food safety documentation across ribbon blenders, planetary mixers, paddle mixers, high-shear mixers, and tumble blenders.
| Task | Frequency | Priority | Responsible |
|---|---|---|---|
| Full drive system inspection — motor, coupling, gearbox alignment check — verify shaft alignment using dial indicator or laser tool; misalignment above 0.05mm TIR accelerates seal and bearing wear | Monthly | Critical | Reliability Tech |
| Electrical panel and control cabinet inspection — check for loose terminals, dust accumulation, and overheating evidence on VFD and motor contactor terminals | Monthly | High | Electrician |
| Check V-belt and timing belt condition and tension across all drive stages — replace belts showing more than 10% elongation or surface cracking; re-tension per OEM specification after replacement | Monthly | High | Maintenance Tech |
| Perform thermographic scan of motor and control panel — identify hot spots on motor windings and panel components indicative of overload or failing insulation | Quarterly | High | Reliability Tech |
| Full structural inspection of mixer frame, legs, and mounting bolts — check for fatigue cracks, loose anchor bolts, and vibration-induced frame deformation, particularly on high-RPM blender models | Quarterly | High | Maintenance Tech |
| Calibrate batch weight and load cell systems — verify load cell output against traceable test weights; out-of-spec weighing systems produce non-conforming product formulations | Quarterly | Critical | Calibration Tech |
| Annual overhaul — full disassembly of agitator, bearings, seals, and drive train — inspect all wear components against OEM dimensions; replace all seals, worn bearings, and degraded fasteners regardless of apparent condition | Annual | Critical | OEM / Contractor |
| Update CMMS asset record with all PM findings, replacements, and measurements — complete PM documentation is the foundation of FSMA, SQF Level 3, and BRC Issue 9 equipment maintenance audit evidence | After every PM | Critical | Maintenance Tech |
| Review spare parts inventory against critical failure modes — confirm stock levels for seals, bearings, blades, belts, and discharge valve components meet minimum coverage for a 72-hour emergency repair scenario | Quarterly | Medium | Maintenance Manager |
| Benchmark mixer OEE (Overall Equipment Effectiveness) against prior quarter — track availability, performance, and quality rate; OEE below 75% on mixing equipment indicates a PM gap requiring program revision | Quarterly | Medium | Maintenance Manager |
Mixer Maintenance Investment Analysis: Costs vs. Returns
A structured mixer and blender maintenance program is not a cost center — it is the most reliable capital protection strategy available to food manufacturing operations. These figures represent typical investment and return outcomes for food plants running documented PM programs on mixing and blending equipment.
| Maintenance Investment | Annual Cost | Annual Savings / Risk Avoided | Payback |
|---|---|---|---|
| Seal and Gasket PM Program | $800 per mixer | $18,000 avoided product loss and contamination events | Under 3 weeks |
| Bearing Lubrication Program | $600 per mixer | $22,000 prevented unplanned downtime and emergency bearing replacement | Under 2 weeks |
| Blade Wear Inspection Program | $700 per mixer | $14,000 avoided metal contamination recall exposure | Under 3 weeks |
| CMMS-Automated PM Scheduling | $1,200 per facility | $48,000 reduction in total reactive maintenance spend | Under 4 weeks |
| Full Annual Overhaul Program | $3,500 per mixer | $85,000 extended equipment life and avoided capital replacement | Under 6 weeks |